2010年11月15日 星期一

New Delphi language features since Delphi 7

http://edn.embarcadero.com/article/34324 轉 post 過來


Abstract: See many of the major new language features in Delphi released after the Delphi 7 version

Language and Compiler Features Since Delphi 7

Inlining
Routines can now be marked with the inline directive.  This tells the compiler that, instead of actually calling the routine, it should emit code that includes the routine at the call site.

Operator Overloading

Delphi allows certain functions, or operators, to be overloaded within record declarations

TMyClass = class
class operator Add(a, b: TMyClass): TMyClass; // Addition of two operands of type TMyClass
class operator Subtract(a, b: TMyClass): TMyclass; // Subtraction of type TMyClass
class operator Implicit(a: Integer): TMyClass; // Implicit conversion of an Integer to type TMyClass
class operator Implicit(a: TMyClass): Integer; // Implicit conversion of TMyClass to Integer
class operator Explicit(a: Double): TMyClass; // Explicit conversion of a Double to TMyClass
end;

// Example implementation of Add class operator
TMyClass.Add(a, b: TMyClass): TMyClass;
begin
...
end;

var
x, y: TMyClassbegin
x := 12; // Implicit conversion from an Integer
y := x + x; // Calls TMyClass.Add(a, b: TMyClass): TMyClass
b := b + 100; // Calls TMyClass.Add(b, TMyClass.Implicit(100))
end;


Class Helpers

A class helper is a type that - when associated with another class - introduces additional method names and properties which may be used in the context of the associated class (or its descendants). Class helpers are a way to extend a class without using inheritance. A class helper simply introduces a wider scope for the compiler to use when resolving identifiers. When you declare a class helper, you state the helper name, and the name of the class you are going to extend with the helper. You can use the class helper any place where you can legally use the extended class. The compiler's resolution scope then becomes the original class, plus the class helper. Class helpers provide a way to extend a class, but they should not be viewed as a design tool to be used when developing new code. They should be used solely for their intended purpose, which is language and platform RTL binding.

type
TMyClass = class

procedure MyProc;
function MyFunc: Integer;
end;

...

procedure TMyClass.MyProc;
var
X: Integer;
begin
X := MyFunc;
end;

function TMyClass.MyFunc: Integer;
begin
...
end;

...

type
TMyClassHelper = class helper for TMyClass
procedure HelloWorld;
function MyFunc: Integer;
end;

...

procedure TMyClassHelper.HelloWorld;
begin
WriteLn(Self.ClassName); // Self refers to TMyClass type, not TMyClassHelper

end;

function TMyClassHelper.MyFunc: Integer;
begin
...
end;
...

var
X: TMyClass;
begin
X := TMyClass.Create;
X.MyProc; // Calls TMyClass.MyProc
X.HelloWorld; // Calls TMyClassHelper.HelloWorld
X.MyFunc; // Calls TMyClassHelper.MyFunc

end;

strict private
The private keyword actually creates a " friendship" relationship between classes in the same unit.  The strict private declaration creates a true private field, not viewable by any other class, not even classes in the same unit.

strict protected
Similar to the strict private declaration, strict protectedcreates a true protected member, visible only to the declaring class and its descendents.

Records with Methods

In addition to fields, records now may have properties and methods (including constructors), class properties, class methods, class fields, and nested types.

type
TMyRecord = record
type
TInnerColorType = Integer;
var
Red: Integer;
class var
Blue: Integer;
procedure printRed();
constructor Create(val: Integer);
property RedProperty: TInnerColorType read Red write Red;
class property BlueProp: TInnerColorType read Blue write Blue;
end;

constructor TMyRecord.Create(val: Integer);
begin
Red := val;
end;

procedure TMyRecord.printRed;
begin
writeln('Red: ', Red);
end;

class abstract

Classes, and not just methods, can be declared as abstract.

type
TAbstractClass = class abstract
procedure SomeProcedure;
end;

class sealed
Classes marked as sealed cannot be inherited from.

type
TAbstractClass = class sealed
procedure SomeProcedure;
end;

class const
Classes can now have class constants -- a constant value associated with the class itself and not an instance of the class.

type
TClassWithConstant = class
public
const SomeConst = 'This is a class constant';
end;


procedure TForm1.FormCreate(Sender: TObject);
begin
ShowMessage(TClassWithConstant.SomeConst);
end;

class type
A class can now contain a type declaration that is usable only within that class.

type
TClassWithClassType = class
private
type
TRecordWithinAClass = record
SomeField: string;
end;
public

class var
RecordWithinAClass: TRecordWithinAClass;
end;
...
procedure TForm1.FormCreate(Sender: TObject);
begin
TClassWithClassType.RecordWithinAClass.SomeField := 'This is a field of a class type declaration';
ShowMessage(TClassWithClassType.RecordWithinAClass.SomeField);
end;


class var
A class can also have a class variable, applicable only to the class and not an instance of the class. See "class type" for an example.

class property
A class can have a class property, which is a property that applies only to the class reference and not to an instance of a class.  The accessors for the class property must be either class methods or class variables. See the example in "static class methods" below.

nested classes
Type declarations can be nested within class declarations. They present a way to keep conceptually related types together, and to avoid name collisions.

type
TOuterClass = class
strict private
MyField: Integer;
public
type
TInnerClass = class
public
MyInnerField: Integer;
procedure InnerProc;
end;
procedure OuterProc;
end;

procedure TOuterClass.TInnerClass.InnerProc;
begin
...
end;

final methods
A virtual method that you override can now be marked final, preventing derived classes from overriding that method.

TAbstractClass = classabstract
public
procedure Bar; virtual;
end;

TSealedClass = classsealed(TAbstractClass)
public
procedure Bar; override;
end;

TFinalMethodClass = class(TAbstractClass)
public
procedure Bar; override; final;
end;

sealed methods
Classes marked as sealed cannot be descended from. See the example in 'final methods'.

static class methods
Classes can have static class methods -- i.e. methods that can be called from a class type. Class static methods can be accessed without an object reference. Unlike ordinary class methods, class static methods have no Self parameter at all. They also cannot access any instance members. (They still have access to class fields, class properties, and class methods.) Also unlike class methods, class static methods cannot be declared virtual.

type
TMyClass = class
strict private
class var
FX: Integer;
strict protected

// Note: accessors for class properties must be declared class static.

class function GetX: Integer; static;
class procedure SetX(val: Integer); static;
public
class property X: Integer read GetX write SetX;
class procedure StatProc(s: String); static;
end;

TMyClass.X := 17;
TMyClass.StatProc('Hello');

for-in loop
Delphi 2007 for Win32 supports for-element-in-collection style iteration over containers. The following container iteration patterns are recognized by the compiler:

  for Element in ArrayExpr do Stmt;
for Element in StringExpr do Stmt;
for Element in SetExpr do Stmt;
for Element in CollectionExpr do Stmt;

LATEST COMMENTS

2010年10月5日 星期二

Learning Plan for Microsoft .NET Framework 4.0, Web Applications Development (Exam 70-515) Step 1


Choosing the Right Programming Model

What does ASP.NET WebForms value?

  • Familiar control and event-base programming model
  • Controls encapsulate HTML, JS and CSS
  • Rich UI controls included - datagirds, charts, AJAX
  • Browser differences handled for you
  • SharePoint Builds on WebForms

What does ASP.NET MVC value?

  • Feels comfortable for many traditional web developers
  • Total control of HTML markup
  • Supports Unit Testing, TDD and Agile methodologies
  • Encourage more prescriptive applications
  • Extremly flexible and extensible

ASP.NET WebForms and ASP.net MVC 是可以在一個網站內共存的

2010年6月14日 星期一

TortoiseSVN 常用指令介紹 Part 3.

上一篇介紹的是每天開工時需做的動作

這一篇要介紹的是工作中常會用到的指令

新增, 刪除, 複製, 移動

  • svn add

  • svn delete

  • svn copy

  • svn move

難免會有做錯的時後,這是類似 VSS 中 Undo CheckOut 的功能

  • svn Revert

當你的工作告一段落時,你要將你所做的修改 Commit 提交至SVN當中

  • svn commit

最後,當在操作 SVN 發生操作中斷

  • svn cleanup


SVN Add, Delete, Copy, Move

svn add 在第一篇時已經有提到過了,基本上就是將新的檔案加入 SVN 當中。那我們在這裡就不再提了

svn delete 刪除有兩個方式,一個是直接立用 檔案總管的功能將檔案刪除,但在 Commit 時會出現 Missing 的狀態,此時將該檔案勾選後再按下 OK 便可以將檔案除 SVN 中刪除。

image

另一個方式是以menu的方式選擇  TortoiseSVN –> delete 將檔案刪除。

image

刪除後記得要再將變更Commit進SVN當中。如此便可完成變更。


至於Copy, Move 呢?? 這也是滿簡單的。請在你要 Copy 或是 Move  的檔案以右鍵的方式拖拉到你想去的位置

image

他會跳出選單來讓你選擇,記得、變更完畢後要 Commit進SVN中。


SVN Revert

這個指令主要用意是將你對這個板本的修改做一個回復,但只限制未 Commit 的部份。

比如我們剛剛修改了檔案,卻發現改錯了。那就可以直接用 Revert 的這個指令

TortoiseSVN –> Revert 來將修改回復。但也要小心使用,要不然可能將你剛剛的心血一不小心就給他白費了。

image

image

將要回復的檔案勾選,按下 OK 便可。


SVN Commit

Commit 是將修改過後的變更提交至 SVN的功能。包括之前所提到的所有功能都需要用 Commit 來將變更提交至SVN。

image

在 Commit 時也可能會發生兩種狀況。

  1. 修改的期間沒有新的版本變動
  2. 修改期間有新的版本變動 –> 需手動作 Merge 的動作 (Merge 在Part2大約有提到過了)

狀況 1 當然是最佳的情境,基本上按下  commit 後就會顯示出成功的結果了

image

但如果遇到有衝突的時後會出現以下的畫面。此時就必需要先做過 Update 的動作了。

image


SVN CleanUp

當 SVN 改變我們的工作拷貝時,有可能會發生 操作中斷、網路斷線、斷電、電腦當機。此時只需要執行 Cleanup 就可以將未完成的功作完成。

image


最後再回顧一下今天用到的指令

新增, 刪除, 複製, 移動

  • svn add

  • svn delete

  • svn copy

  • svn move


  • svn Revert


  • svn commit
  • svn cleanup

2010年6月13日 星期日

TortoiseSVN 常用指令介紹 Part 2. SVN Update

每天開發專案的第一事應該就是將前一天其他組員所開發的結果更新至自已的電腦中。

SVN 的指令就是 SVN Update

image

Update 之後可能會出現三個狀況。

  1. 工作十分順利,昨天同組員所變更的項目並無衝突 (Conflict) 發生。Update 之後直接會將新的程式碼下載至你的工作目錄中。
  2. 不好,發生了衝突。但Merge的程式還是可以自動將程式合併。
  3. 哇!! 發生衝突了,而且又合併失敗。此時就需要手動的合併了!!

在十分順利的狀況之下,會出現類似以下的畫面,發現有人修改一個檔案並增加了另一個檔案,TortoiseSVN 會自動的將檔案更新。

image

如果說有發生衝突的話呢?? 當SVN 可以判別時,他會自動的將衝突合併,所以一般而言並不會造成我們的困擾。如下圖,在 SVN Update之後,他會自動的幫我們合併在一起

image

但如果說,無法自動合併的話呢?? 那就得手動來判別了。

當無法自動合併時會出現以下的訊息。此時就需要一些手動的操作來解決衝突問題了。

image

我們會發現有衝突發生時檔案的圖示會有一個驚嘆號出現 image

我們必需選擇 TortoiseSVN –> Edit conflicts

image

image

Merge 的操作這裡先不提。基本上它會把檔案上不同的部份全部列出來來讓我們比較合併。

但這樣子的狀況並不會常常發生,所以也不用太擔心。

合併完成後再選擇 TortoiseSVN –> Resolved 告知 SVN 我們已解決了衝突的問題了。

再將我們所做的變更 Commit 進 SVN 中便算完成。

image

經過 Update 之後我們就算是取得了最新的程式副本了,那就可以開始一天的工作了。


這一篇介紹的指令有

  • SVN Update
  • TortoiseSVN –> Edit conflicts

TortoiseSVN 常用指令介紹 Part 1.

當我們使用 SVN 來當作我們版本控制的工具時,我們必需先得知我們版本庫的所在位置。也就是 URL of repository。

第二步就是要設定我們的 工作目錄 以下就來介紹如何設定

SVN CheckOut

1.先在所要工作的目錄上按右鍵,選擇 SVN CheckOut

image

2.設定 URL of repository 至你的 Repository URL後,按下 OK

image

3.SVN 會將目前 Server 上的資料 download 下來,目前只有三個目錄。

image

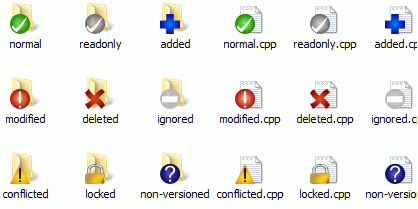
目錄的圖示也會變成下面的樣子,綠色的勾勾代表目前這個工作目錄與 SVN Repository 上的相同

image

順便介紹一下 TortoiseSVN 的圖示

Explorer showing icon overlays

基本上,建議在下班前的狀態都是 Normal 的狀態。

4.接下來在工作目錄裡建立一個目錄 這個範例裡是 D:\Temp\TestForSVN\FirstApp

image 目錄的圖示會變成一個問號,代表的是這個目錄還沒加到 SVN 中。

5.假設我們的專案產生了一些檔案,接下來我們要將它們加入SVN中。

在剛剛產生的目錄按右鍵選 TortoiseSVN –> Add

image

因為有些檔案是不需要加入 SVN 中的,所以我們要將它們取消圈選。

image

按下 OK 後會將檔案 加入 SVN 中。可以看到我們這一次加了 8 個檔案。

image

請注意,此時我們所做的更動還沒 Commit 進 SVN 中。所以目前目錄的狀態是 Added 要再 Commit 之後才算完成。

image

在目錄上按右鍵選擇 SVN Commit 將我們剛剛的變更寫入 SVN 中

image

我們在剛剛已經有選擇過要加入SVN中的檔案了,所以在這裡不用再選一次。直接按下 OK 就好了

image

按下 ok 後會顯示出結果。 大工告成。

image

我們也會發現,現在的目錄變成了normal 的狀態(有時目錄的狀態不會馬上更新,請等一下或是做 Refresh便可)

image

所以今天介紹的指令有

  1. SVN Check Out -> 初始化檢出 - 設定工作拷貝
  2. SVN Add -> 將新的項目加入 SVN 中
  3. SVN Commit -> 提交修改

2010年4月22日 星期四

在 Visual Studio 中使用 SVN

上次在安裝完了 svn 之後,接下來就是要讓 Visual Studio 整合 svn。

網路上有一些套件可供使用。在這裡我們所採用的是 ankhsvn,下載之後直接安裝就可以了。

我們簡單的介紹一下如何在 Visual Studion 中如何使用。

首先先新增一個專案,我們會發現到,多了一個 Add to Subversion 的選項

image

按下 ok 後會出現加入 svn 的畫面,將 Repository Url 改為你 svn 的位置。在這裡是 svn://svnserver/test/

image

選好之後會請你輸入帳號密碼,就照我們之前在 passwd 那個檔案中所設定的,我們設定的是

user : testuser

password : testpw

輸入完畢之後,會出現下面的畫面,他會在你選的目錄下再建立一個 Project Name 的目錄。所以不用特地再建立新的目錄。

image

建立好之後可以看到我們的 solution windows 中的檔案多了一個符號 image 這代表這是一個新的檔案,尚未 Commit 至 repository 中。

image

在 solution 上按右鍵 選擇 Commit Solution Changes 將 solution Commit 進去

image

之後檔案的狀態會更改為image 此時如果有對檔案做任何的修改的話狀態會更改為 image

image

修改完畢之後記得要再 Commit 進 svn 中。但在 commit 之前千萬要記住,要先 compile 過,不要將有問題的 code commit 進 svn. 這樣會照成大家的麻煩。

2010年4月21日 星期三

Install SVN on DS1010+

DS1010+ 是 Synology NAS 產品,性能似乎十分的強大。網路上也有許多可以應用的資源。最近公司需要使用到版本控管的功能。於是便有想在 DS1010+ 上安裝 SVN 的念頭。因為 DS1010+ 基本上是跑 linux 的系統,再加上它所使用的 CPU 是 Intel ATOM 的系統,所以與之前 Synology 所提供的 Package 不同。著實讓我花了不少時間。

以下就是我安裝的過程

所有的資料都來自於 Synology 的wiki  Step-by-step guide to installing Subversion。有興趣的人也可以直接上去參考。

1. Enable CLI on your Diskstation  將啟動 SSH 功能打勾

image

2. 建立啟動 subversion 服務的使用者

因為diskstation 是跑 Linux 系統的,所以 subversion 需要一個啟動它的使用者,這裡所使用的是 svnowner。記住,這個使用者的密碼可以要設的複雜一點。而且就算你忘了也沒關係。因為基本上我們是不會用到他去做登入的動作。image


3.建立一個共用資料夾供 svn 使用。

在這裡我所使用的是 svn 目錄,記得要給 admin 及 svnowner 有讀寫的權限。並將其他所有的權限都移除。

4. 安裝 ipkg bootstrap

在這裡我參考了另一個討論串(IPKG for DS1010+)及另一個Blog,Diskstation 的預設是沒有 ipkg 的(ipkg 是在嵌入式裝置上最見的套件管理系統),我們需要利用 ipkg 來安裝我們所需要的套件。

    1. 利 用 putty 進入到 DS1010+ 中的命令模式。
    2. get the script from internet
        wget http://ipkg.nslu2-linux.org/feeds/optware/syno-i686/cross/unstable/syno-i686-bootstrap_1.2-7_i686.xsh


    3. run it   

        sh ./syno-i686-bootstrap_1.2-7_i686.xsh


    4. reboot


    5. after reboot, login with root。 變更 ipkg 所查詢的位址

        vi /opt/etc/ipkg.conf


    6. 在開啟檔案後加入以下紅色的文字,因為 DS1010+ 的cup 是 intel atom 系列的,所以我們要採用的是 syno-i686 的 Feed


    7. # Uncomment one of the following package feeds or resolve your arch
      # by visiting http://ipkg.nslu2-linux.org/feeds/optware/
      # src nslu2 http://ipkg.nslu2-linux.org/feeds/optware/nslu2/cross/stable
      # src fsg3 http://ipkg.nslu2-linux.org/feeds/optware/fsg3/cross/stable
      # src ddwrt http://ipkg.nslu2-linux.org/feeds/optware/ddwrt/cross/stable
      # src xwrt http://ipkg.nslu2-linux.org/feeds/optware/ddwrt/cross/stable
      # src whiterussian http://ipkg.nslu2-linux.org/feeds/optware/ddwrt/cross/stable
      # src oleg http://ipkg.nslu2-linux.org/feeds/optware/oleg/cross/stable
      # src ts72xx http://ipkg.nslu2-linux.org/feeds/optware/ts72xx/cross/stable
      # src/gz openwrt-brcm24 http://ipkg.nslu2-linux.org/feeds/optware/openwrt-brcm24/cross/u
      # src/gz openwrt-ixp4xx http://ipkg.nslu2-linux.org/feeds/optware/openwrt-ixp4xx/cross/u
      dest root /

      #option verbose-wget
      #
      # Proxy support:
      #
      #option http_proxy http://localhost:5865
      #option ftp_proxy http://proxy.tld:3128
      #option proxy_username <username>
      #option proxy_password <password>

      src syno-d1010 http://ipkg.nslu2-linux.org/feeds/optware/syno-i686/cross/unstable


    1. 更新 ipkg 的資料


    2. ipkg update
      ipkg upgrade


    3. 到這裡 ipkg 可說是可以使用了,接下來我們要開始來案裝 Subversion


    4. ipkg install svn


5. 設定 SVN 


    vi /etc/inetd.conf


  1. 加入下面的設定到最後一行


  2. svn stream tcp nowait svnowner /opt/bin/svnserve svnserve -i -r /volume1/svn


  3. svnowner 就是我們剛才所新增的使用者,/volume1/svn 就是我們剛才所新增的共用目錄。


  4. vi /etc/service


  5. 加入下面的設定到最後一行


  6. svn 3690/tcp #subversionsvn 3690/udp #subversion


  7. 重新開機 reboot


  8. 重新開機後要來設定 SVN 存放空間(Repository)的權限


    1. su svnowner
      cd /volume1/svn
      svnadmin create test


    2. 你可以將 [test] 改成你想要的名稱。經過以上的指令後會在svn 目錄中新增一個 test 的目錄,現在我們要經由編輯裡面的檔案來設定存取的權限


    3. vi /volume1/svn/test/conf/passwd


    4. 加入


    5. [users]
      testuser = testpw


    6. vi /olume1/svn/test/conf/svnserve.conf


      加入

      [general]

      anon-access = none


      auth-access = write


      password-db = passwd


      realm = I am your test repository


大功告成,接下來就是使用 svn client 去存取這個 Repository 了